CÁCH CHỌN GIÀY ĐI BỘ TỐT NHẤT KHÔNG ĐAU CHÂN

Cách chọn giày đi bộ tốt nhất không đau chân. Khi chọn giày thể thao, bạn thường chú ý đến kiểu dáng và màu sắc bắt mắt mà quên mất tìm hiểu thời gian bạn cần phải thay thế chúng cũng như cách lựa chọn chúng như thế nào là tốt nhất?


Cách Chọn Giày Leo Núi Và Đi Bộ –

Đôi chân của bạn luôn cần giày bảo vệ trong những cuộc di chuyển đường dài. Vậy làm sao để chọn một đôi giày vừa phù hợp với sở thích, vừa bảo vệ sức khỏe và đôi chân của bạn? Mà lại đảm bảo các tiêu chuẩn chất lượng cơ bản mà giá thành vẫn phải chăng và tính ứng dụng cao? Để làm được điều này, bạn cần có những kiến thức cơ bản về cấu tạo, cấu trúc và chức năng của từng loại giày để so sánh và cân nhắc khi chọn giày.

giày đi bộ

Chú ý đến trọng lượng là cách bạn chọn giày leo núi và đi bộ. Ảnh: internet

Trọng lượng của giày

Khi chọn mua giày, bạn nên để ý đến trọng lượng của giày. Bởi một đôi giày quá nặng sẽ làm bạn rất mệt khi di chuyển. Nên chọn loại giày có trọng lượng càng nhẹ càng tốt. Nó giúp chân bạn di chuyển nhẹ nhàng, linh hoạt hơn. Nhiều nghiên cứu cho thấy rằng, giày chỉ nặng thêm 1g thì tương đương với cảm giác ba lô nặng thêm 5g.

Khả năng chống nước của giày

Độ ẩm là một trong những kẻ thù của giày. Độ ẩm cao làm rộp da chân do tăng ma sát với thành giày. Bởi vậy, bạn hãy luôn chú ý giữ cho giày của mình khô ráo, thông thoáng. Giày cần được làm từ các vật liệu thông thoáng giúp hơi ẩm dễ dàng thoát ra từ mặt trong của giày. Tuy nhiên cũng cần phải chống được nước từ ngoài ngấm vào.

Độ cứng thành giày

Giày phải đảm bảo đủ độ cứng để bảo vệ chân và mắt cá chân khi tiếp xúc với những bề mặt không bằng phẳng. Các loại giày với thiết kế cao cổ sẽ giúp bảo vệ mắt cá chân của bạn tốt hơn.

Độ cứng theo chiều dọc

Giày phải đủ độ cứng để đế không bị cong khi bạn nhấn mạnh vào phần ngón chân hoặc gót chân, đồng thời cũng phải đảm bảo độ mềm mại, đủ để bám tốt khi đi bộ.

Độ ôm của giày

Giày phải ôm vừa vặn với bàn chân sao cho chân không bị bè ra khi phải mang vác nặng. Nếu cần thiết, bạn có thể thêm một miếng đệm dọc theo lòng bàn chân để tăng độ ôm cho giày. Điều này giúp bạn thoải mái khi di chuyển.

Bạn nên nghiên cứu kỹ cấu trúc và các chức năng của giầy trước khi mua. Ảnh: internet

Phần mũ giày

Mũ giày là phần tiếp giáp mũi giày, tiếp giáp với lưỡi gà của giày và trải dài sang hai bên má giày. Mũ giày phải bảo vệ được chân và hấp thụ các lực tác động lên mũ giày ngoài ý muốn để bảo vệ được chân. Ngoài ra, mũ giày cũng phải thông thoáng và chống được nước.

Đế giày

Đế giày là phần dưới của giày, tiếp xúc trực tiếp với các bề mặt địa hình. Khi chọn mua giày, bạn cần phải quan sát kĩ đế giày để chọn lựa cho mình đôi giày phù hợp với chuyến đi. Phần lớn đế giày làm từ cao su để tăng ma sát và giảm thiểu sự mài mòn. Để tạo ra ma sát, người ta thiết kế đế giày với các rãnh sâu và gai nhọn, điều này làm tăng độ bám lên các bề mặt. Ở bề mặt trơn trượt, càng nhiều gai cao su càng tăng lực ma sát vào bề mặt giúp bạn tránh được trơn trượt. Ở bề mặt mềm, những mấu cao su sẽ ấn sâu xuống làm giúp giày bám tốt hơn. Đế giày cũng phải hấp thu và phân tán những chấn động khác để không bị ảnh hưởng tới bàn chân. Đế giày phải đủ cứng nhưng cũng phải đủ mềm để đi được tự nhiên. Nó cũng phải được gắn hoặc khâu chặt chẽ với mũ giày để chống nước tốt. Có rất nhiều kiểu phân bố gai cao su ở đế giày. Vì thế hãy tìm hiểu kĩ thông tin chuyến đi để chọn mua đôi giày phù hợp nhất.

Lưỡi giày


Lưỡi giày là phần đánh dấu khung đỏ trong hình. Ảnh: internet

Lưỡi giày là phần tính từ phần tiếp giáp với mũ giày. Lưỡi giày được đính với mũi giày và hai bên thành má giày. Lưỡi giày ôm sát giúp bảo vệ mu bàn chân của bạn, phần này có thể co giãn giúp giày ôm sát chân bạn hơn. Nhiều loại giày đi bộ sử dụng một miếng đệm giữa phần mũ giày và lưỡi giày. Trong trường hợp này, miếng đệm phải đảm bảo liên kết tốt với lưỡi giày để tránh cho cát, sỏi, bụi, nước có thể xâm nhập vào bên trong giày. Khi buộc dây giày, bạn nên chú ý để không tạo các điểm ép làm đau chân. Lưỡi giày phải làm từ các vật liệu thông thoáng nhưng đồng thời cũng phải chống được nước. Phần may hoặc dán phải đảm bảo kín để giữ nhiệt và chống nước.

Cổ giày/ Miếng đệm vòng quanh cổ chân

Cổ giày là phần ôm sát cổ chân của bạn. Thông thường, các loại giày đi bộ thường trang bị thêm một miếng đệm vòng quanh cổ chân để chân thoải mái hơn khi tiếp xúc với cổ giày. Phần đệm này thường được làm từ vải sợi tổng hợp hoặc mút giữ nhiệt. Ở các loại giày cao cổ, ở chỗ mà cổ chân tiếp xúc trực tiếp với giày cũng được đệm lót để tránh gây tổn thương cho da và giúp bạn thoải mái hơn khi di chuyển.

Lót giày

Lót giày nằm ở phía bên trong giày. Lót giày rất quan trọng, nó giúp bảo vệ lòng bàn chân của bạn không bị tổn thương khi tiếp xúc với đế giày. Ngoài ra, lót giày còn giúp giữ thăng bằng. Nên chọn loại lót giày làm từ chất liệu hút ẩm tốt, không gây mùi và đặc biệt phải phù hợp với kích cỡ bàn chân của bạn.

Gót giày

Gót giày là mặt sau của giày giúp bảo vệ mắt cá chân và phần gân ở phía sau cổ chân của bạn. Gót giày phải đủ cứng để để hỗ trợ cho chân bạn, đồng thời, phần trong của gót giày cũng phải được bọc lót cẩn thận để giảm tổn thương đối với da.

Mũi giày

Mũi giày là phần mà mũ giày tiếp xúc với đế giày. Mũ giày có tác dụng bảo vệ các ngón chân của bạn. Khi chọn mua giày, bạn cũng nên để ý đến độ cong của mũi giày,độ cong của mũi giày quyết định rất lớn đến nhịp bước chân trong khi di chuyển.

bí Quyết Chọn Giày Leo Núi Và Đi Bộ

Người thường xuyên sử dụng giày để đi bộ, chạy, leo núi… phân loại theo sắp xếp từ giày nhẹ tới nặng. Hiểu biết về các loại sẽ giúp bạn lựa chọn đúng đắn cho đôi giày của mình.

Chọn theo mục đích sử dụng

Giày đi trên đường mòn: Thật ra đây là loại giày chạy nhưng có thêm một số tính năng phù hợp hơn với đường mòn và đường mấp mô. Nó có nhiều miếng đệm ở chỗ ngón chân hơn và có đế bền dẻo hơn để phù hợp với điều kiện sử dụng khó khăn hơn.

Giày đi bộ: Loại này đã bắt đầu được xếp vào nhóm giày đi bộ chuyên dùng nhưng chỉ sử dụng ở các con đường đi bộ được làm sẵn hoặc không quá khó khăn và thường là đi trong ngày. Chất liệu bằng da lộn, da đanh mặt, nylon, vải nhẹ. Nó mềm và dễ uốn. Nhiều thiết kế giày này có những đai chịu lực để bảo vệ chân và mắt cá nhưng không cao hơn mắt cá chân. Một số loại cao cấp còn thiết kế lưỡi giầy chống nước và sỏi đá rơi vào trong giầy. Tuy nhiên, nhiều đôi giày thời trang thiết kế có hình dạng bên ngoài giống loại giày này nhưng không có những tính năng cần thiết cho việc đi bộ, do vậy bạn cần lưu ý kiểm tra kỹ.

Giày đi bộ đường dài: Cũng giống loại giày đi bộ loại thông thường trên nhưng sử dụng cho những địa hình khó khăn hơn. Loại này sử dụng trong các cuộc đi bộ dài ngày. Nó làm từ vật liệu da lộn và các vật liệu chắc chắn khác. Đế giày thường cứng hơn để bảo vệ chân. Cổ giày cao hơn mắt cá nên có thể bạn sẽ cảm thấy không thoải mái nhưng nó bảo vệ chân rất tốt.

Giày đi rừng/giày bảo hộ: Loại giày này để dụng trong những địa hình khó khăn. Nó có nhưng thiết kế bảo vệ chân như gia cố phần mũi giày, đế giày rộng và chắc, những đường gờ chịu lực. Mặt trong của giầy thường bằng những vật liệu đặc biệt để giữ thông thoáng. Loại giày này phù hợp với leo núi vì được thiết kế để chịu lực tốt, phân tán lực khi có va chạm nhưng vẫn thông thoáng và chịu nước. Đôi khi còn có những đinh sắt gia cố. Giày này thường cứng và nặng hơn.

Giày leo núi: Loại giày này được thiết kế đặc biệt giúp bạn chinh phục những vùng núi tuyết băng giá. Nó có những thiết kế với các đinh ở đầu mũi giày. Có khi giày này có những vòng nhựa quanh mắt cá để bảo vệ giống như giày trượt tuyết,bên trong được làm từ các chất liệu giữ ấm cực tốt. Tuy nhiên, không khuyến khích bạn chọn loại giày này nếu bạn phải đi bộ dài ngày.

giày leo núi

Để chọn được giày phù hợp với đôi chân của bạn rất đơn giản, nếu bạn tìm hiểu đủ thông tin. Ảnh: internet

Quan sát giày trước khi chọn

Hãy quan sát kỹ để nhận thấy giầy không bị rách, trầy xước, keo lem nhem. Bằng cách bóp nhẹ vào thân giầy để cảm nhận độ cứng vừa đủ. Một đôi giầy đẹp cũng có nhiều tiêu chuẩn ngoại quan. Bạn nên chú ý đến thương hiệu và logo của hãng sản xuất để tránh mua phải giày kém chất lượng.

Quan sát đôi giầy bằng cách đặt chiếc giầy lên một mặt phẳng, xem chiếc giầy có cân đối không. Giầy không bị nghiêng vẹo, các tâm của đầu mũi giầy và đầu gót giầy đều phải thẳng. Chạm nhẹ vào đỉnh của mũi hoặc gót giầy không bị bập bênh.

Trước khi thử, bạn nhớ kiểm tra gót giầy xem có bị cộm, gồ ghề do các vật liệu nhỏ còn sót lại không, đưa tay vào lòng giầy để chắc chắn miếng lót không bị quấn hoặc keo dán chảy ra lòng giầy. Điều này sẽ giúp bạn tránh phồng rộp hoặc chai cứng bàn chân sau thời gian dài sử dụng.

Thử giày

Đưa chân vào giày mở không buộc dây. Đứng thẳng và nhấn mạnh chân vào phía mũi giày, khi đó, bạn phải cảm thấy chân của bạn phải trượt vào trong một cách dễ dàng và có thể đút được ngón tay trỏ vào giữa gót giày và gót chân bạn.

Ngồi xuống và buộc hai dây lại. Khi bạn buộc giày, bàn chân bạn sẽ trượt trở lại đằng sau, lấp vào khoảng không mà ngón tay trỏ đã tạo ra.

Đứng dậy và đi vòng quanh. Ngón chân bạn không được chạm vào mặt trong của mũi giày và cọ vào mặt trên bên trong của mũi giày. Nếu bị vậy, cần mua đôi giày rộng hơn một chút ở phần trước của giày.

Khi bạn đi bộ, gót chân và gót giày phải chuyển động nhịp nhàng với nhau. Gót chân không được trượt lên trượt xuống so với gót giày.

Câu “giày thừa dép thiếu” là không phù hợp với giày đi bộ. Nếu giày rộng, khi bạn đi bộ sẽ có khoảng cách giữa chân và giày và sẽ rất mất sức hoặc bị cọ sát trầy da. Ngoài hình dáng bắt mắt, bạn phải chọn giầy đúng kích cỡ. Tuyệt đối không chọn giầy nhỏ hơn chân dù bạn rất thích mẫu giầy đó.

Bạn nên đi mua giày vào buổi chiều để bảo đảm giày không bị chật. Nếu bạn không ngọ nguậy được các ngón chân tức là giày quá chật. Giày chật hoặc quá hẹp ở mũi sẽ làm tăng khả năng viêm kẽ ngón chân và lâu ngày sẽ làm ngón chân bị biến dạng chút ít.

Nên thử cả hai chân. Thường chúng ta có một chân này “nhỉnh hơn” chân kia một chút. Khi thử giày, nên đi kèm loại tất mà bạn thường mang với giày.

Cách lựa chọn giày thể thao phù hợp 

Những nguy hiểm khi chọn giày thể thao chưa phù hợp

Bất cứ teen khi thường xuyên chơi thể thao đều phải đối mặt với những rủi ro nơi bàn chân, mắt cá chân và các vết thương khác. Nhưng thực tế khi tham gia các hoạt động thể thao, bạn có thể giảm thiểu những chấn thương này nếu mang giày phù hợp và hoạt động đúng.

Cách chọn giày thể thao theo cảm tính riêng là hoàn toàn sai. Hãy chắc chắn rằng, bàn chân của bạn được nằm gọn một cách thoải mái nhất trong giày. Giày phải phù hợp với hình dạng bàn chân bạn không quá rộng cũng không quá chật chội. Nếu quá bó buộc chân phải phù hợp với giày có thể dẫn tới những nguy hiểm sau:

* Vết bỏng giộp, phồng da

* Chân bị chai, sần

* Nốt viêm tấy ở kẽ ngón chân cái

* Cục chai ở chân

* Ngón chân khoằm xuống

* Sự biến dạng chân

* Gây ra những vết thương nơi bàn chân, mắt cánhân vàcác vết thương nghiêm trọng khác.

Nếu bạn tham gia vào một môn thể thao hoặc luyện tập 3 lần/ tuần thì giày thể thao là người bạn đồng hành tốt nhất. Giày thể thao đã được thiết kế dành riêng cho các hoạt động cụ thể phù hợp với tính chất của bộ môn thể thao và trọng lượng cơ thể. Thiết kế này nhằm bảo vệ các khu vực của bàn chân khi phải đối mặt với những căng thẳng lúc luyện tập.

Cách lựa chọn giày thể thao?

* Thử cả hai bàn chân khi đo giày. Vì bàn chân có thể tăng/ giảm kích cỡ hơn so với đôi giày cũ đã mua của bạn.

* Thử giày ở bàn chân lớn nhất của bạn. Hầu hết mọi người đều có một bàn chân lớn hơn chân kia.

* Mang giày cùng với loại tất và quần áo thể thao bạn sẽ mặc cùng.

* Lung lay ngón chân của bạn. Nếu bạn có thể tự do lung lay tất cả những ngón chân trong một không gian nhỏ hẹp thì tức là giày đó phù hợp với bạn.


* Chú ý kích cỡ và phong cách mỗi loại giày thể thao thường khác nhau do sự khác biệt giữa các thương hiệu giày.

* Đảm bảo rằng bạn cảm thấy rất thoải mái khi thử giày.

* Nếu có thể hãy mang giày đi bộ một đoạn hoặc chạy một khoảng cách ngắn để đảm bảo bạn hoàn toàn tin tưởng vào sự thoải mái của giày.

* Cảm thấy gót chân của bạn thật vững chắc.

Thời gian tốt nhất bạn nên thay thế một đôi giày thể thao?

Thời gian để thay thế một đôi giày thể thao phụ thuộc vào số lượng sử dụng, dấu hiệu của giày và tuổi của giày. Giày thể thao nói chung nên được thay thế khi:

* Bạn đã sử dụng giày được 300-500 dặm chạy

* Bạn đã có 300 giờ tích cực hoạt động cùng với giày

* Bạn đã sử dụng giày với 45-60 giờ bóng rổ, aerobic dance hay quần vợt

Chú ý:

Ngay cả khi giày thể thao chưa được bạn sử dụng nhiều nhưng vẫn có thể cần phải thay thế một đôi giày mới. Vì môi trường bên ngoài có thể làm cho chúng hoạt động kém hơn.

Trước khi bạn mua một đôi giày thể thao mới, hãy xem lại những đôi giày cũ của bạn xem chúng đã mòn như nào. Từ đó bạn có thể muốn tìm kiếm một ưu điểm mới với sự ổn định hơn hoặc hỗ trợ tốt hơn cho loại hình thể thao của bạn ở đôi giày sắp mua

Basic Hockey Rules

HOCKEY MADE SIMPLE

THE PLAYERS

Goaltender:: The goalie’s primary task is simple – keep the puck out of his own net. Offensively, he might start his team down the ice with a pass, but seldom does he leave the net.

Defensemen: These players try to stop the incoming play at their own blue line. They try to break up passes, block shots, cover opposing forwards (center and wings) and clear the puck from in front of their own goal. Offensively, they get the puck to their forwards and follow the play into the attacking zone, positioning themselves just inside their opponent’s blue line at the “points.”

Center: The quarterback on the ice, the center leads the attack by carrying the puck on offense. He exchanges passes with his wings to steer the play toward the opposing goal. On defense, he tries to disrupt a play before it gets on his team’s side of the ice.

Wings: The wings team with the center on the attack to set up shots on goal. Defensively, they attempt to break up plays by their counterparts and upset shot attempts.

THE OFFICIALS

Referee: The referee supervises the game, calls the penalties, determines if goals are scored and handles faceoffs at center ice at the start of each period.

Linesmen: Two are used. They call offside, offside pass, icing and handle all faceoffs not occurring at center ice. They do not call penalties, but can recommend to the referee that a penalty be called.

Goal Judges: One sits off-ice behind each goal and indicates when the puck has crossed the red goal line by turning on a red light just above his station. The referee can ask his advise on disputed goals, but the referee has final authority and can overrule the goal judge.

Official Scorer: He determines which player scores and credits assists if there are any. He might consult the referee, but the scorer is the final authority in crediting points.

HOCKEY’S THREE MAIN RULES

Offsides: When any member of the attacking team precedes the puck over the defending team’s blue line.

Offside (or two-line)Pass: When a player passes the puck from his defending zone to a teammate beyond the red center line.

Icing: When a player shoots the puck across the center red line and past the opposing red goal line. Icing is not called if the player’s team is killing a penalty, a teammate of the player shooting the puck touches it before a player from the opposing team, the defending goalie touches the puck first or if the puck travels through the crease (semicircle of blue paint at the “mouth” of the goal) on its way to the red line.

THE PENALTIES

A team plays shorthanded when one or more of its players is charged with a penalty. However, no team is forced to play more than two players below full strength (six) at any tiime. If a third penalty is assessed to the same team, it is suspended until the first penalty expires. When a penalty is called on a goalie, a teammate serves his time in the penalty box.

Minor Penalty: Two minutes – Called for boarding, charging, cross-checking, elbowing, holding, hooking, high-sticking, interference, roughing, slashing, spearing, tripping and unsportsmanlike conduct.

Major Penalty: Five minutes – Called for fighting or when minor penalties are committed with deliberate intent to injure. Major penalties for slashing, spearing, high-sticking, butt-ending and cross-checking carry automatic game misconducts.

Misconduct: Ten minutes – Called for various forms of unsportsmanlike behavior or when a player incurs a second major penalty in a game. This is a penalty against an individual and not a team, so a substitute is permitted.

Penalty Shot: A free shot, unopposed except for the goalie, given to a player who is illegally impeded from behind when in possession of the puck with no opponent between him and the goal except the goalie. The team which commits the offense is not penalized beyond the penalty shot, whether it succeeds or not.

Delayed Penalty: The whistle is delayed until the penalized team regains possession of the puck.

Top of page

PENALTIES AND REFEREE’S SIGNALS

boarding
BOARDING
Called for driving, throwing,
checking or tripping an
opponent which causes the
opponent to be thrown
violently into the boards.
charging
CHARGING
Called for running, jumping or
charging into an opponent
(usually taking more than three
strides before impact).
  crosscheck
CROSS-CHECKING
Called when a player delivers a
check with both hands on his
stick and no part of the stick on
the ice.
elbowing
ELBOWING
Called when a player
uses his elbow to foul
another player.
highsticking
HIGH-STICKING
Called whan a player carries
or holds his stick above the
normal height of the waist of
an opponent and the stick
causes injury to that opponent.
holding
HOLDING
Called whan a player holds
an opponent with his hands
or stick. Holding the stick is
called for, well, holding an
opponent’s stick.
hooking
HOOKING
Called when a player impedes
or seeks to impede the progress
of an opponent by “hooking” him
with his stick.
interference
INTERFERENCE
Called when a player impedes
or seeks to impede the progress
of an opponent who is not in
possession of the puck.
misconduct
MISCONDUCT
Called for various forms of
misconduct including the use
of abusive language to any
person, challenging an official’s
ruling, etc. (also given to a
player receiving two major
penalties in a game).
roughing
ROUGHING
Called when a player or
players are deemed guilty
of unnecessary roughness,
engaging in fisticuffs and/or
shoving.
slashing
SLASHING
Called when a player swings
his stick at an opponent or
impedes or attempts to impede
an opponent by slashing with
his stick.
spearing
SPEARING
Called when a player stabs an
opponent with the point of the
stick blade while the stick is
being carried with one or both
hands.
tripping
TRIPPING
Called when a player
places his stick, knee,
foot, arm, hand or elbow
in such a manner that it
causes his opponent to
trip or fall.
washout
WASHOUT
When signaled by a linesman,
it means there is no offsides
or icing. The referee will also
use this signal to “wave off” a
goal.
 

Top of page


COMMON QUESTIONS ABOUT THE GAME OF HOCKEY

What is the puck made of?
The puck is made of vulcanized rubber and is three inches in diameter and one inch thick, weighing about six ounces. It is frozen before entering play to make it bounce resistant.

How fast does the puck travel?
Some of the game’s hardest shooters send the puck toward the net at speeds between 90 and 100 mph with the elite shooters easily topping the century mark. Making things even more difficult on the goalie is the puck will frequently curve in flight, much like a baseball.

Which shot is the hardest for a goalie to stop?
Generally speaking, it is one that’s low and to the stick side. Some goaltenders overplay to the stick side, presenting a more inviting target on the glove side.

What about deflections?
Deflections aren’t just luck. Players practice redirecting shots by standing at the side of the net and knocking a shot from the outside past the goalie into another area of the goal.

Which is tougher for the goalie to stop a slap shot or a wrist shot?
The slap shot, while it is harder and faster, is easier for the goalie to time than a wrist shot, which takes the goalie more by surprise.

How thick is the ice?
The ice is approximately 3/4″ thick and is usually kept at 16 degrees for the proper hardness. The thicker the sheet of ice becomes, the softer and slower it is.

What are the standard dimensions of the rink?
The standard is 200′ by 85′, although some do vary.

Can the puck be kicked in for a goal?
Not intentionally. However, if a puck is deflected off a skate or off a player’s body and no overt attempt is made to to throw it or kick it in, a goal is allowed.

What if an offensive player is in the crease?
If he is there under his own power and the puck goes in, the goal is disallowed. A goal can be awarded if the player was forced into the crease or held there by a defensive player. An offensive player is allowed to carry the puck into the crease and score.

Why do goalies frequently come out of in front of their net?
Usually when a goalie leaves the area immediately in front of the goal it is to reduce the shooting area, cut down the angle of the shooter or for the offensive player to release his shot before he would like to. After coming out of the net, the goalie is usually backing up slowly in an attempt to get the shooter to commit himself first.

Who gets credited for an assist?
The last player or players (no more than two) who touch the puck prior to the goal scorer are awarded assists. For example, if player A passes to player B who passes to player C who scores a goal; players A and B get assists.

Why doesn’t the referee stop fights?
There are several. First, it is his job to watch what is going on and determine who should be penalized. Also, it is quite hazardous in close during a fight and since he is in sole control of the game, he has to protect himself from injury.

How are the markings – the red and blue lines, goal lines, crease and face-off circles – applied to the ice?
The ice is built up to a half-inch thickness by spraying water over the concrete floor, which has the freezing pipes embedded into it. Then the markings are painted on, after which additional water is sprayed to coat the markings and build the ice to the prescribed thickness.

What are hockey sticks made of?
Hockey sticks are made of wood, generally northern white ash or rock elm, or aluminum. The handle is one piece and the laminated wooden blade is affixed to it.

Are all sticks alike?
Far from it. Just as baseball players have individually personalized bats, so too do hockey players have their own patterned sticks. Flexibility, the angle of the blade, weight, etc., vary from player to player.

Top of page

HOCKEY TALK

For fans new to the game, hockey has a language all its own. The following guide should be helpful in picking up hockey’s lingo.

Back Check: To hinder an opponent heading toward and into the defending zone.

Blue Lines: The pair of one-foot wide blue lines which extend across the ice at a distance of 60 feet from each goal. These lines break up the ice into attacking, neutral and defending zones.

Body Check: Use of the body on an opponent. It is legal when the opponent has possession of the puck or was the last player to have touched it.

Butt-ending: To hit an opponent with the end of the stick farthest from the blade. It is illegal and calls for a penalty.

Goal Crease: Area directly in front of the goaltender. It is four feet wide and eight feet long and marked off by red lines. Offensive players who do not have possession of the puck may not enter.

Deke: To fake an opponent out of position.

Face Off: The dropping of the puck between one player from each team to begin or resume play.

Forecheck: To check an opponent in his end of the rink, preventing an offensive rush.

Freezing the Puck: To hold the puck against the boards with either the skate or stick to get a stoppage of play.

Goal Line: The red line which runs between the goal posts and extends in both directions to the side boards.

Goal Mouth: The area just in front of the goal and crease lines.

Hat Trick: The scoring of three or more goals by a player in one game.

One-timer: Hitting the puck directly upon receiving a pass. The offensive player takes his backswing while the puck is on its way to him and tries to time his swing with the arrival of the puck.

Penalty Box: The area opposite the team benches where penalized players serve time.

Power Play: A power play occurs when a team has a one-man or two-man advantage because of an opponent’s penalties.

Pulling the Goalie: Replacing the goalie with an extra skater in a high-risk attempt to tie the game. This primarily occurs when a team trails, usually by one goal, late in the game.

Save: A shot blocked by the goaltender, which would have bean a goal had it not been stopped.

Screened Shot: The goaltender’s view is blocked by players between he and the shooter.

Slap Shot: Hitting the puck with the blade of the stick after taking a full backswing.

Slot: The area immediately in front of the goal crease. It is from this zone that most goals are scored and where the most furious activity takes place.

Splitting the Defense: The player with the puck attempts to squeeze between the opponent’s defensemen.

Stick Handling: To control the puck along the ice with the stick.

Top Shelf: Term used to describe when an offensive player shoots high in an attempt to beat the goalie by shooting the puck into the top portion of the net.

Wraparound: A player skates around behind the opposing goal and attempts to wrap the puck around the goal post and under the goalie.

Wrist Shot: Hitting the puck with the blade of the stick using a quick snap of the wrist rather than a full back swing.
Rink Dimensions
Top of page

LINES

The center line divides the ice in half lengthwise. It is used to judge icing, meaning that if a team sends the puck across the center line (red line), blue line and then across the goal line (that is to say, shoots or dumps the puck past the goal line from behind their own side of the center line) it is said to be icing. It is a thick line, and in the NHL must “contain regular interval markings of a uniform distinctive design, which will readily distinguish it from the two blue lines.” When discussing differences in the rules of the game, it is often said that a game is played with no red line. This simply means that there is no two-line pass violation. The center line is still used to judge icing violations.

There are two thick blue lines that divide the rink into three parts, called zones. These two lines are used to judge if a player is offside. If an attacking player crosses the line into the other team’s zone prior to the puck crossing, he is said to be offside.

Near each end of the rink, there is a thin red goal line spanning the width of the ice. It is used to judge goals and icing calls.

FACEOFF SPOTS AND CIRCLES

faceoff_spot
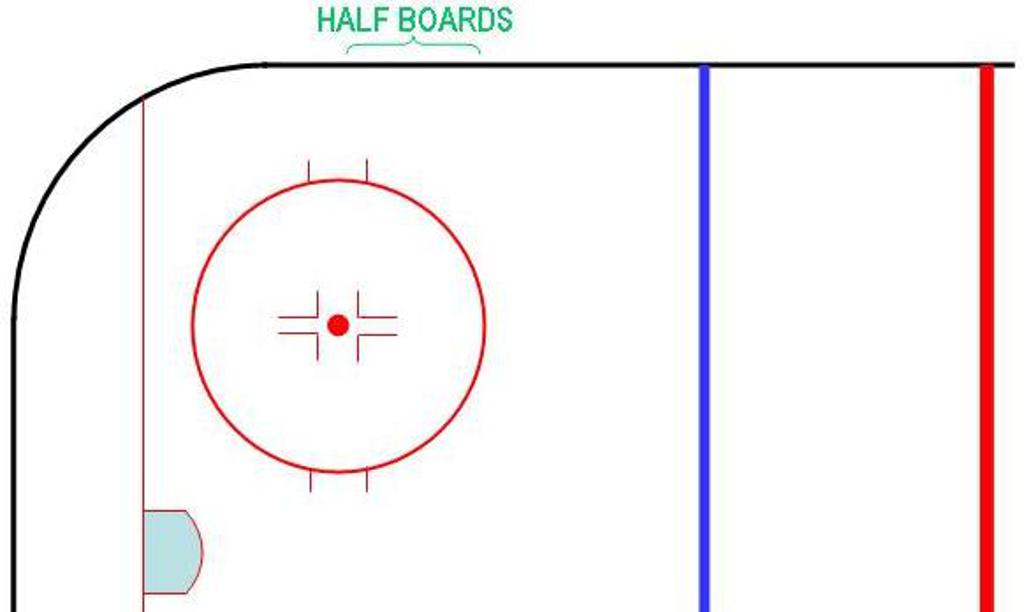
There are 9 faceoff spots on a hockey rink. Most faceoffs take place at these spots. There are two spots in each end zone, two at each end of the neutral zone, and one in the center of the rink.

There are faceoff circles around the center ice and end zone faceoff spots. There are hash marks painted on the ice near the end zone faceoff spots. The circles and hash marks show where players may legally position themselves during a faceoff.

The center faceoff spot is typically blue. The center circle may be red or blue. Usually all other faceoff spots and circles are red.

GOAL POSTS AND NETS

At each end of the ice, there is a goal consisting of a metal goal frame and cloth net in which each team must place the puck to earn points, or goals. The opening of the goal, which sits on the goal line, is 6 feet (1.8 m) wide by 4 feet (1.2 m) high (1.83 × 1.22 m). The tubes extending vertically from the goal line are called the goal posts, and the tube that connects these at the top of the goal frame is called the crossbar.

Ice hockey is one of the few team sports in which there is a live area of play behind the goal. The goal frame extends 44 inches (1.12 m) behind the goal line. The sides of the frame are rounded outwards with a 20-inch (50.8 cm) radius. The rounded portion of the goal frame prevents players behind the net from passing the puck to the front of the net right along the goal post. In many cases, players try to take advantage of the shape of the goal by deliberately passing the puck off the bottom of the goal frame. This can cause the puck to change direction in a way that confuses the opposing team.

The back of the goal frame is covered in a net to catch pucks shot into the goal. The goal posts and crossbar are painted red. The inside part of the goal frame is padded to keep pucks that enter the net from rebounding out.

The goal frame is moored to the ice with flexible pegs, which are designed to allow the net to move freely if a player crashes into the goal. At many multipurpose rinks, metal pins are used that only protrude about a quarter of an inch (a centimeter) into the ice, as the flexible pegs require large holes that cannot be repaired by an ice resurfacer drilled into the ice.

Top of page

GOAL AREA

rink-creasesIn front of each goal, there is a goal crease, which is surrounded by thin red lines and filled in with light blue. The crease is a special area of the ice designed to allow the goaltender to perform his or her duties without interference. In most leagues, no attacking player may enter the goal crease with a stick, skate, or any body part before the puck. For the purposes of this rule, the crease extends vertically from the painted lines to the top of the goal frame. This rule was eliminated from the National Hockey League and other North American professional leagues beginning in the 1999-2000 season.

In amateur and international hockey, the goal crease is a half circle with radius of 6 ft (1.8 m). In the NHL and North American professional leagues, this goal crease is truncated by straight lines extending from the goal line 1 ft (30.5 cm) outside each goal post.

GOALTENDER TRAPEZOID

During the 2004-05 AHL season, an experimental rule was implemented for the first seven weeks of the season. This additional area behind the goal line is officially referred to as the Goaltender Trap Zone, but is more frequently called the trapezoid in reference to its shape. The area consists of a centered, symmetrical trapezoid. The bases of the trapezoid are formed by the goal line and the end boards. The base on the goal line measures 18 feet (5.5 m) and the base on the end boards measures 28 feet (8.5 m). It is prohibited for the goaltender to handle the puck anywhere behind the goal line that is not within the trapezoidal area. If he does so he is assessed a minor penalty for delay of game. The motivation for the introduction of the trapezoid was to promote game flow and prolonged offensive attacks by making it more difficult for the goaltender to possess and clear the puck.

The seven-week experiment proved so successful that the AHL moved to enforce the rule for the rest of the season, and then was approved by the NHL when play resumed for the 2005-06 season following the previous lockout. The ECHL, the only other developmental league in the Professional Hockey Players Association (along with the AHL) also approved the rule for 2005-06.

The zone has been referred to as different names. The Trapezoid is the most common, but former Chicago Wolves broadcaster coined the term “Forbidden Zone” possibly taking a line from the film Strange Brew.

REFEREE CREASE

The referee crease is an area in front of the scorekeepers bench that no player may enter during a stoppage of play. It has no function during play. If a player enters the referee crease during stoppage of play he/she will be ejected.

ZONES

rink-zonesThe blue lines divide the rink into three zones. The central zone is called the neutral zone or simply center ice. The generic term for the outer zones is end zones, but they are more commonly referred to by terms relative to each team. The end zone in which a team is trying to score is called the attacking zone or offensive zone; the end zone in which the team’s own goal net is located is called the defending zone or defensive zone.

The blue line is considered part of whichever zone the puck is in. Therefore, if the puck is in the neutral zone, the blue line is part of the neutral zone. It must completely cross the blue line to be considered in the end zone. Once the puck is in the end zone, the blue line becomes part of that end zone. The puck must now completely cross the blue line in the other direction to be considered in the neutral zone again.

Top of page

BENCHES

There are five or seven benches outside a hockey rink: two players benches where the players and coaches of each team sit during the game, two penalty benches where penalized players serve their time, and a scorekeepers bench where most of the off-ice officials sit. Often, there is also a goal judge bench behind each goal where the goal judge sits.

GLASS

In many rinks, the height of the boards is extended with glass or plexiglas to prevent pucks from leaving the playing surface and injuring spectators. Often, there is netting above the glass for further protection. Pucks that deflect off the glass and remain inside the rink are still in play, whereas pucks that hit the netting are considered out of play.

HALF BOARDS

In a hockey rink, the half boards are the area along the side boards half-way between the blue line and the goal line, roughly from the hash marks to the top of the faceoff circle.

half-boards

Badminton

Each organization is allowed 1 singles and 1 doubles team. A student may compete in both.
Rules

  • A player must wait until his opponent is ready before serving. If the opponent attempts a return then he is ruled having been ready.
  • The feet of both players must remain in a stationary position until the serve is made. Your feet can not be touching the line at this time.
  • It is not a fault if you miss the shuttle while serving.
  • The shuttle cannot be caught and slung with the racket.
  • A player cannot hold his racket near the net to ward off a downward stroke by his opponent or to interfere with his racket.

Faults

  • The shuttle, at the instant of being hit is higher than the servers waist or the head of the racket is higher than the servers racket hand.
  • The shuttle does not land in the correct service court.
  • The server’s feet are not in the service court or if the feet of the receiver are not in the court diagonally opposite the server.
  • The server steps forward as he/she serves.
  • Any player balking or feinting his opponent before serve or during serve.
  • A serve or shot that lands outside the court boundaries, passes under or through the net, touches any other obstructions or a players body or clothing. The boundary and service lines are considered in play.
  • The shuttle in play is struck before it crosses the net to the striker’s side of the net. You may follow through over the net.
  • A player touching the net or its supports with his body or racket while the shuttle is in play.
  • Hitting the shuttle twice in succession by a player or team.

Scoring System

  • A match consists of the best of 3 games of 21 points.
  • Every time there is a serve – there is a point scored.
  • The side winning a rally adds a point to its score.
  • At 20 all, the side which gains a 2 point lead first, wins that game.
  • At 29 all, the side scoring the 30th point, wins that game.
  • The side winning a game serves first in the next game.

Interval and Change of Ends

  • A 1 minute interval between each game is allowed.
  • In the third game, players change ends when the leading score reaches 11 points.

Singles

  • At the beginning of the game (0-0) and when the server’s score is eventhe server serves from the right service court. When the server’s score is odd, the server serves from the left service court.
  • If the server wins a rally, the server scores a point and then serves again from the alternate service court.
  • If the receiver wins a rally, the receiver scores a point and becomes the new server. They serve from the appropriate service court – left if their score is odd, and right if it is even.

Doubles

  • A side has only one ‘set’.
  • The service passes consecutively to the players as shown in the diagram.
  • At the beginning of the game and when the score is even, the server serves from the right service court. When it is odd, the server serves from the left court.
  • If the serving side wins a rally, the serving side scores a point and the same server serves again from the alternate service court.
  • If the receiving side wins a rally, the receiving side scores a point. The receiving side becomes the new serving side.
  • The players do not change their respective service courts until they win a point when their side is serving.

If players commit an error in the service court, the error is corrected when the mistake is discovered.
In a doubles match between A & B against C & D.  A & B won the toss and decided to serve. A to serve to C. A shall be the initial server while C shall be the initial receiver.


Course of action / Explanation

Score

Love All

Service from Service Court


Right Service Court. Being the score of the serving side is even.

Server & Receiver

A serves to C. A and C are the initial server and receiver.

Winner of the rally

A & B


rules-dir1

A & B win a point. A & B will change service courts. A serves again from Left service court. C & D will stay in the same service courts. 1-0 Left Service Court. Being the score of the serving side is odd A serves to D C & D rules-dir2
C & D win a point and also right to serve. Nobody will change their respective service courts. 1-1 Left Service Court. Being the score of the serving side is odd. D serves to A. A & B rules-dir3
A & B win a point and also right to serve. Nobody will change their respective service courts. 2-1 Right Service Court. Being the score of the serving side is even. B serves to C C & D rules-dir4
C & D win a point and also right to serve. Nobody will change their respective service courts. 2-2 Right Service Court. Being the score of the serving side is even. C serves to B C & D rules-dir5
C & D win a point. C & D will change service courts. C serves from Left service court. A & B will stay in the same service courts. 3-2 Left Service Court. Being the score of the serving side is odd. C serves to A A & B rules-dir6
A & B win a point and also right to serve. Nobody will change their respective service courts. 3-3 Left Service Court. Being the score of the serving side is odd. A serves to C A & B rules-dir7
A & B win a point. A & B will change service courts. A serves again from Right service court. C & D will stay in the same service courts. 4-3 Right Service Court. Being the score of the serving side is even. A serves to D C & D rules-dir8

Note that this means:

  • The order of server depends on the score odd or even same as in singles.
  • The service courts are changed by the servicing side only when a point is scored. In all other cases, the players continue to stay in their respective service court from where they played previous rally. This shall guarantee alternate server.

Football (Soccer) Rules

ootball (Soccer) is one of the oldest sports in the world and with that; it’s also one of the most recognised. The pinnacle of the international game comes in the form the Football World Cup. There are also tournament such as the Euro Championships, Copa America and the African Cup of Nations. Domestically the strongest leagues come from England (English Premier League), Spain (La Liga), Italy (Serie A) and Germany (Bundesliga). In parts of the world the sport is also known as Soccer.

Object of the Game

The aim of football is to score more goals then your opponent in a 90 minute playing time frame. The match is split up into two halves of 45 minutes. After the first 45 minutes players will take a 15 minute rest period called half time. The second 45 minutes will resume and any time deemed fit to be added on by the referee (injury time) will be accordingly.

Players & Equipment

Each team consists of 11 players. These are made up of one goalkeeper and ten outfield players. The pitch dimensions vary from each ground but are roughly 120 yards long and 75 yards wide. On each pitch you will have a 6 yard box next to the goal mouth, an 18 yard box surrounding the 6 yard box and a centre circle. Each half of the pitch must be a mirror image of the other in terms of dimensions.

Essentially the equipment that is needed for a soccer match is pitch and a football. Additionally players can be found wearing studded football boots, shin pads and matching strips. The goalkeepers will additionally wear padded gloves as they are the only players allowed to handle the ball. Each team will have a designated captain.

Scoring

To score the ball must go into your opponent’s goal. The whole ball needs to be over the line for it to be a legitimate goal. A goal can be scored with any part of the body apart from the hand or arm up to the shoulder. The goal itself consists of a frame measuring 8 feet high and 8 yards wide.

Winning the Game

To win you have to score more goals than that of your opponents. If the scores are level after 90 minutes then the game will end as a draw apart from in cup games where the game can go to extra time and even a penalty shootout to decide the winner. Players must use their feet to kick the ball and are prohibited to use their hands apart from goalkeepers who can use any part of their body within the 18 yard box (of which more can be found out in the next section).

Rules of Football (Soccer)

  • A match consists of two 45 minutes halves with a 15 minute rest period in between.
  • Each team can have a minimum off 11 players (including 1 goalkeeper who is the only player allowed to handle the ball within the 18 yard box) and a minimum of 7 players are needed to constitute a match.
  • The field must be made of either artificial or natural grass. The size of pitches is allowed to vary but must be within 100-130 yards long and 50-100 yards wide. The pitch must also be marked with a rectangular shape around the outside showing out of bounds, two six yard boxes, two 18 yard boxes and a centre circle. A spot for a penalty placed 12 yards out of both goals and centre circle must also be visible.
  • The ball must have a circumference of 58-61cm and be of a circular shape.
  • Each team can name up to 7 substitute players. Substitutions can be made at any time of the match with each team being able to make a maximum of 3 substitutions per side. In the event of all three substitutes being made and a player having to leave the field for injury the team will be forced to play without a replacement for that player.
  • Each game must include one referee and two assistant referee’s (linesmen). It’s the job of the referee to act as time keeper and make any decisions which may need to be made such as fouls, free kicks, throw ins, penalties and added on time at the end of each half. The referee may consult the assistant referees at any time in the match regarding a decision. It’s the assistant referee’s job to spot offside’s in the match (see below), throw ins for either team and also assist the referee in all decision making processes where appropriate.
  • If the game needs to head to extra time as a result of both teams being level in a match then 30 minutes will be added in the form of two 15 minute halves after the allotted 90 minutes.
  • If teams are still level after extra time then a penalty shootout must take place.
  • The whole ball must cross the goal line for it to constitute as a goal.
  • For fouls committed a player could receive either a yellow or red card depending on the severity of the foul; this comes down to the referee’s discretion. The yellow is a warning and a red card is a dismissal of that player. Two yellow cards will equal one red. Once a player is sent off then they cannot be replaced.
  • If a ball goes out of play off an opponent in either of the side lines then it is given as a throw in. If it goes out of play off an attacking player on the base line then it is a goal kick. If it comes off a defending player it is a corner kick.

The Offside Rule in Football

Offside can be called when an attacking player is in front of the last defender when the pass is played through to them. The offside area is designed to discourage players from simply hanging around the opponent’s goal waiting for a pass. To be onside they must be placed behind the last defender when the ball is played to them. If the player is in front of that last defender then he is deemed to be offside and free kick to the defending team will be called.

A player cannot be caught offside in their own half. The goalkeeper does not count as a defender. If the ball is played backwards and the player is in front of the last defender then he is deemed to be not offside.

Vanilla Buttercream Frosting

Ingredients

3
cups powdered sugar
1/3
cup butter or margarine, softened
1 1/2
teaspoons vanilla
1
to 2 tablespoons milk
Buy Ingredients Powered by Chicory

Steps

  • 1
    In medium bowl, mix powdered sugar and butter with spoon or electric mixer on low speed. Stir in vanilla and 1 tablespoon of the milk.
  • 2
    Gradually beat in just enough remaining milk to make frosting smooth and spreadable. If frosting is too thick, beat in more milk, a few drops at a time. If frosting becomes too thin, beat in a small amount of powdered sugar. Frosts 13×9-inch cake generously, or fills and frosts an 8- or 9-inch two-layer cake.

  • A real buttercream frosting takes little time to make, can be tinted with food coloring (use paste or gel, not liquid food color), and will hold for several weeks if tightly covered.

Expert Tips

  • Use a real vanilla; imitations are not recommended. If you can find a vanilla bean paste it’s well worth the investment. The role of vanilla is not only for its flavor value, it also enhances the sweetness of the sugar, so bumping up the vanilla allows you to decrease the amount of sugar in recipes.
  • Allow your butter to soften at room temperature so it easily beats up smoothly with the powdered (sometimes called confectioner’s) sugar. Boost the amount of butter to as much as 3/4 cup for a rich, decedent frosting and use an unsalted butter if you like.
  • It’s easy to vary the flavor of this core recipe: stir in a dash of almond extract, grated citrus zest, or a little bit of edible lavender buds. Adding finely chopped fresh rosemary is incredible on a lemon pound cake.

Nutrition Information

More About This Recipe

  • Four simple ingredients—sugar, butter, vanilla and milk—come together in a homemade frosting recipe that proves the whole is greater than the sum of its parts. Hundreds of home cooks and bakers have used this recipe for decorating cakes, filling layer cakes or topping off a pan of brownies. Before you begin, check out this step-by-step tutorial on making frosting. You’ll learn that a perfect buttercream frosting recipe starts with room-temperature butter that can still hold its shape but is starting to soften at the edges. Test it by pressing a finger into the butter; if it gives and your finger leaves an indent, it’s ready to go. Once you’ve mastered vanilla buttercream frosting, expand your skill set with more frosting recipes.

Ultimate Chocolate Chip Cookies

Ingredients

3/4
cup granulated sugar
3/4
cup packed brown sugar
1
cup butter, softened
1
teaspoon vanilla
1
egg
2 1/4
cups Gold Medal™ all-purpose flour
1
teaspoon baking soda
1/2
teaspoon salt
1
package (12 ounces) semisweet chocolate chips (2 cups)
1
cup coarsely chopped nuts, if desired
Buy Ingredients Powered by Chicory

Steps

Hide Images
  • 1

    Heat oven to 375ºF.

  • 2

    In large bowl, beat granulated sugar, brown sugar, butter, vanilla and egg with electric mixer on medium speed or mix with spoon until well blended. Stir in flour, baking soda and salt (dough will be stiff). Stir in chocolate chips and nuts.

  • 3

    Drop dough by rounded tablespoonfuls about 2 inches apart onto ungreased cookie sheet.

  • 4
    Bake 8 to 10 minutes or until light brown (centers will be soft). Cool 1 to 2 minutes; remove from cookie sheet. Cool on wire rack.

Expert Tips

  • There are lots of baking science behind what makes a soft, chewy cookie versus a crisp, crunchy cookie. The ratio and type of sugars used, the amount of butter or shortening, and how much flour is stirred in all make a difference.
  • Use a 1-inch meatball scooper (or a #16 cookie/ice cream disher) to make consistently round cookies.
  • We don’t need to tell you that you can choose what your ultimate cookie is—macadamia and white chocolate chunk? Chocolate double peanut butter (chips + crushed peanuts)? Or salted butterscotch toffee (butterscotch chips + toffee chips, sprinkled with coarse salt before baking)? You decide!
  • Line flat baking sheets with parchment and be sure to give the dropped dough plenty of air space, so the cookies won’t bump into each other as they spread.
  • Make monster cookies—use a larger scoop and press candy-coated pieces into the dough or stir in bits of chopped mini peanut butter cups.

Nutrition Information

More About This Recipe

  • There are times when a store-bought or bakery cookie is fine, but homemade chocolate chip cookies are the right choice for lazy summer afternoons, unexpected snow days or that holiday party that just wouldn’t be the same without these beauties on the cookie tray. If there’s anything we’re willing to experiment with, it’s finding just the right kind of chocolate chip cookie that suits our tastes. After baking, testing and tasting over and over again, we landed on this recipe for the best chocolate chip cookies ever. If you’d like, amplify your cookie baking game with a little help from Betty Crocker’s guide on how to make the best chocolate chip cookies ever. Even better, this recipe is reliable enough that you can use it as a base for a little experimentation—try different kinds of chips and nuts for easy flavor twists. You’ll find more creative ideas in this chocolate chip cookie recipe collection.
  • https://www.bettycrocker.com/recipes/ultimate-chocolate-chip-cookies/77c14e03-d8b0-4844-846d-f19304f61c57

6 BƯỚC CHỌN GIÀY ĐÁ BÓNG PHÙ HỢP NHẤT VỚI ĐÔI CHÂN BẠn

Cách chọn giày đá bóng phù hợp nhất với đôi chân bạn

Có hàng chục đôi giày đá bóng khác nhau về mẫu mã, màu sắc, kích cỡ. Vậy làm sao có thể chọn ra đôi giày phù hợp nhất vơi mình, giúp bảo vệ chân, hỗ trợ chơi bóng và thể hiện bản thân? Sau đây mình xin đưa ra một số ý kiến, mong sẽ giúp bạn chọn được giày đá bóng tốt nhất !

1. Phong cách chơi của bạn?

Xác định cho mình vị trí, phong cách, lối chơi sẽ giúp bạn chọn cho mình 1 đôi giày phù hợp nhất. Nếu bạn đầu tư tốt vào một vị trí nào đó, nó sẽ giúp bản cải thiện kỹ năng một cách tốt nhất.

Thủ môn: bạn sẽ cần nhiều về độ bám để có thể di chuyển nhiều và linh hoạt trong một không gian hẹp. Bên cạnh đó có thể thêm một vài yếu tố hỗ trợ lực sút cũng như chuyền ngắn.

Hậu vệ: Vì bạn cần tắc bóng, va chạm nhiều và thi đấu “rát” nên một đôi giày bảo vệ tốt sẽ tạo cho bạn sự yên tâm. Điều bạn cần nhiều nhất sẽ là sự bảo vệ.

Tiền vệ: bạn sẽ cần một đôi giày thật thoải mái và kiểm soát bóng tốt. Vì tiền vệ cần chạy lên chạy về nhiều trên sân nên độ thoải mái là cần thiết khi bạn phải đá ít nhất trong vài chục phút. Bên cạnh đó yếu tố hỗ trợ kiểm soát bóng sẽ giúp ích cho bạn hơn.

Tiền đạo: sự lựa chọn sẽ thiên về một đôi giày chuyên hỗ trợ sút bóng và bên cạnh đó là nhẹ để bứt tốc và tạo sự bất ngờ.

+ Các cầu thủ chạy cánh(sân lớn): bạn sẽ cần một đôi giày thật nhẹ để hỗ trợ tối đa về tốc độ và bên cạnh đó là độ bám để bạn có thể chuyển hướng nhanh và dễ dàng.

2. Bạn thường chơi ở mặt sân nào?.

Đế giày phù hợp với mặt sân bạn đá sẽ đem lại nhiều lợi ích cả về độ bám lẫn sự an toàn cho chân, bên cạnh đó về lâu dài là độ bền của giày.

FG – Firm Ground: đế FG thường sử dụng cho mặt cỏ tự nhiên có bề mặt khô, ít được tưới nước hoặc không mưa thường xuyên

SG/SG Pro – Soft Ground: dùng cho các mặt sân cỏ tự nhiên ở những nơi mưa nhiều hoặc được tưới nước thường xuyên. Các cầu thủ chuyên nghiệp châu Âu thường lựa chọn SG vì sân thi đấu luôn được tưới nước rất thường xuyên.

AG – Artificial Grass: đế AG đang được chú trọng nhiều hơn từ các nhà sản xuất. Sân cỏ nhân tạo đang mọc lên ngày càng nhiều và không chỉ riêng ở Việt Nam mà còn các nước Âu hay Mỹ. Tuy nhiên sân cỏ nhân tạo đạt đúng chuẩn chất lượng sẽ có độ dày và độ lún nhất định.

+ TF – Turf: đế TF có lẽ là đế được dùng nhiều nhất ở Việt Nam Đế TF thiết kế với đinh dăm cao su nhỏ, thích hợp nhất cho đa số sân cỏ nhân tạo tại VN vì có độ dày thấp, độ lún không nhiều.

IC – Indoor: đế IC là để bằng, chủ yếu được sử dụng cho các mặt sân bằng phẳng và cứng như sân trong nhà, sân sàn gỗ hoặc sân xi măng.

3. Trọng lượng giày

Đây sẽ là phần mà nhiều bạn quan tâm. Thời gian gần đây ngày càng nhiều những thiết kế siêu nhẹ được ra đời, vì vậy cũng sẽ có nhiều người quan tâm về độ nhẹ của giày hơn. Đôi giày thuộc hàng nhẹ nhất hiện nay rơi vào khoảng 5.5-5.6oz và nặng nhất là tầm 11oz. Ở tầm 7oz trở xuống mẫu đó sẽ được xem là siêu nhẹ, 7-8oz là giày nhẹ, 8-10oz là giày ở mức bình thường và 10oz trở lên sẽ là một đôi giày khá nặng nề. Việc chọn giày theo trọng lượng sẽ còn tùy thuộc vào sở thích của mỗi người tuy nhiên bạn nên nhớ rằng, giày càng nhẹ sẽ thì nó sẽ càng mỏng manh hơn và ngược lại giày nặng sẽ chắc chắn hơn.

4. Giày nào phù hợp với lối chơi của bạn?

Các loại giày cũng được chia ra nhiều phân khúc với nhau, bên cạnh đó là những mẫu take down (cùng mẫu mã kiểu dáng nhưng sử dụng vật liệu ít tiền hơn, giảm bớt chi tiết trên giày nên giá sẽ rẻ hơn). Các line giày chính:

Control (kiểm soát bóng): thiết kế hỗ trợ kiểm soát bóng ở những vùng thường xuyên dùng để chuyền bóng hay khống chế bóng.

Power (sức mạnh): hỗ trợ tăng thêm lực cho những pha sút bóng cũng như dứt điểm hay chuyền dài.

Accuracy (chính xác): đem lại cho bạn hỗ trợ về việc bend (đá xoáy), dip (đá chúi, lá vàng rơi)  trong những cú sút bóng hay những đường chuyền xa.

Speed (tốc độ): bạn sẽ nhận được một đôi giày nhẹ để tăng tối đa tốc độ của bạn trên sân. Chúng thường được thiết kế rất đơn giản, ít vật liệu và dùng vật liệu nhẹ nhất có thể.

Heritage (truyển thống): những mẫu giày mang đầy tính retro như Copa, Premier hay Tiempo, mang vẻ đẹp truyền thống, bên cạnh đó là sự thoải mái và độ bền cao.

Hybrid (kết hợp): những dòng kết hợp giữa những phân khúc khác nhau như giữa tốc độ và kiểm soát bóng, sức mạnh và độ chính xác hay tốc độ và sức mạnh.

5. Bề rộng bàn chân của bạn thế nào?

Rất nhiều người đi mua giày những lần đầu tiên sẽ hay mắc phải những vấn đề về độ rộng của bàn chân. Mỗi một dòng giày sẽ có độ rộng bàn chân và độ ôm khác nhau. Nếu bạn có thể đến store và thử từng loại một thì sẽ rất ok cho bạn, còn những ai phải order online thì sau đây sẽ là những lời khuyên để bạn có một đôi giày ưng ý:

+ Đọc những bài review chi tiết về giày, chủ ý vào các phần độ thoải mái, độ ôm và chọn size.

+ Hỏi bạn bè về những mẫu giày mà họ đã dùng, thử về độ rộng chân, độ ôm …

+ Nếu không chắc chắn về độ rộng thì không bao giờ nên mua rồi cố mang cho nó giãn ra vì không phải giày nào/chất liệu nào cũng có khả năng co giãn tốt.

+ Nên chọn những line giày có chất liệu da tự nhiên, nhất là K-leather vì nó co giãn rất rất tốt.

size giay da bong tai the thao vip

6. Size giày phù hợp nhất?

Nhiều bạn khi mua một mẫu giày nào đó, nhất là khi ở chỗ bán chỉ còn 1 hoặc 2 đôi cuối cùng thì bạn sẽ chọn đại một size tuy rằng nó sẽ hơi bó hoặc hơi rộng. Đây là điều khá có hại vì không phải chất liệu nào cũng có thể co giãn tốt theo độ dài của bàn chân. Khi mang chơi thể thao, tức là bạn sử dụng nó ở cường độ cao, việc bít chân sẽ đem lại ảnh hưởng không tốt đến lưu thông máu, đó là chưa kể đến ảnh hưởng về tính năng mà đôi giày đem lại. Nếu giày rộng sẽ tăng khả năng chấn thương. Vì vậy tốt nhất bạn nên:

+ Chọn một đôi giày vừa chân với một khoảng cách nhỏ giữa các đầu ngón chân vơi mũi giày, không nên chọn giày khi gót chân và mắt cá bị ép chặt.

+ Chọn giày với độ ôm và bề rộng chân phù hợp như hướng dẫn ở phần trước

+ Khi mang toàn bộ bàn chân phải thoải mái và các đầu ngón chân có thể cử động một chút.

+ Khi thử giày ở store bạn nên thử kỹ một chút, đi qua đi lại vài lần, thử ấn giày vào những vị trí như bẻ mũi chân hay nhảy lên để kiểm tra xem chân có chỗ nào bị kích hay quá chặt hay không, nếu có bạn cần đổi ngay.

Lời kết

Mong những điều trên sẽ kết hợp lại và giúp bạn chọn được một đôi giày ưng ý nhất với những yêu cầu của mình.

P/s:  Bạn có thể xem những mẫu giày mới nhất của Nike, Adidas tại: http://thethaovip.vn

4 hướng dẫn chọn giày thể thao cho người thấp

1. Size chân phù hợp

Hình ảnh 4 hướng dẫn chọn giày thể thao cho người thấp số 1
4 hướng dẫn chọn giày thể thao cho người thấp

Với các cô nàng chân ngắn, việc lựa chọn một đôi giày có size vừa vặn là điều vô cùng quan trọng. Chúng không chỉ để bạn có bước đi thoải mái nhất, mà còn giúp các nàng tự tin sải bước trong mọi không gian.

Một lưu ý không thể bỏ qua là các nàng đừng nên mua giày vào buổi chiều, bởi ấy là lúc chúng ta sở hữu đôi bàn chân to nhất.

2. Nên tránh những đôi giày có cổ

Nếu không muốn chân mình trở nên cục mịch, nặng nề, các nàng chân ngắn hãy tránh xa những đôi giày cao cổ, có dây buộc hoặc họa tiết lèo nhèo, làm mất đi vẻ thanh thoát vốn có của đôi chân bạn.

Hình ảnh 4 hướng dẫn chọn giày thể thao cho người thấp số 2
 Nên tránh những đôi giày có cổ

Một đôi giày đơn giản, không quá cầu kì chính là gợi ý tuyệt vời dành cho người thấp. Chúng không những tạo thiện cảm với người đối diện mà còn mang lại cảm giác cao ráo cho bạn.

3. Phối hợp với màu trang phục

Hình ảnh 4 hướng dẫn chọn giày thể thao cho người thấp số 3
Phối hợp với màu trang phục

Màu trang phục trùng với màu đôi giày thể thao bạn đang sở hữu chính là mách nhỏ không bỏ qua. Không chỉ giúp các nàng chân ngắn được cao và thanh mảnh hơn, màu sắc phù hợp còn sẽ tạo ra cảm giác đồng đều của vóc dáng.

4. Giày thể thao giấu đế

Nếu còn tự ti về chiều cao của mình, một đôi giày thể thao giấu đế chính là lựa chọn không thể bỏ qua dành cho các nàng.

Những mẫu giày thể thao này thường sẽ giúp tăng từ 3 đến 5 cm nhờ tấm lót giày bí mật nằm bên trong.

Cách ăn gian chiều cao ấy sẽ giúp bạn trở nên tự tin hơn với vóc dáng của mình.

Tuy nhiên, bạn đừng nên chọn những đôi giày quá cao bởi chúng sẽ gây nên cảm giác mất tự nhiên và thoải mái, đồng thời tạo mối nghi ngờ cho mọi người.

Với những hướng dẫn cách chọn giày thể thao cho người thấp trên đây, các cô nàng nấm lùn chắc chắn đã chọn được cho mình một sản phẩm ưng ý rồi phải không nào?

Bên cạnh đó, bạn gái muốn chọn đôi giày cao gót thật đẹp vừa thoải mái có thể tìm hiểu thêm mẹo chọn giày cao gót cho bạn tự tin và năng động của chúng tôi thực hiện trước đó nhé.

Basketball – How to Play?

The ball is tossed in the air to start the game. One of the players deflects it to a teammate. It is dribbled and passed among the teammates to protect the ball and to make a goal. The basket or the hoop is placed horizontally at the height of 10 feet on a back board. Each team tries to protect the goal on their side while trying to make a goal on the opponent’s side of the court.

The opposite team tries to get the ball, take control of it while bouncing and tries to grab it while it is passed among the team mates to prevent a goal. When a player commits a foul, the other team gets a chance of free throw or to inbound the ball. Each goal carries two points and each free throw one point. The team with higher score wins the game. Players may be substituted when a substitute asks for it.

The game starts when the referee throws a jump ball. In the international sport, each game is divided into four 10 minute periods. However, if there’s a tie between the teams they play for an extra period of 5 minutes.

After the first period and after the third period, the players take a 2 minute break. After the second period the players take a 15 minute break and exchange baskets. After a break, the last player holding the ball throws the ball in and starts the next period.

How to Play

The play time may also be increased if a foul is committed just before the time ticks off. In such cases a free throw is granted despite the time lapse.

If a player throws the ball before the time lapses, but the ball flies down the basket after the timer ticks off, the goal is still considered.

Rules of the Game

Though basketball was invented with a set of thirteen rules, some rules were amended and many rules were added to help players play faster and make the game more interesting for the viewers. Some rules were introduced to minimize the advantage of height enjoyed by taller players.

There are many variants of the game at different places and these branches have governing bodies formulating rules of the game. In the US, basketball tournaments are very popular in colleges. Their rules in inter-collegiate championships are slightly different from the professional basketball sport.

  • Any player possessing the ball cannot stay inside the foul ring of the court with his back to the basket for more than three seconds
  • No player should touch the ball, basket or its rim while the ball is passing through the basket.
  • Players are allowed to make a brief contact with an opposing player trying to pass the ball or make a goal, but cannot obstruct them.
  • Players making more than five fouls are removed from the game.
  • Fouls as per the situation, grant free throws to the opposing team and the ball is handed over to them.
  • Players cannot carry the ball with them and walk or run. This is called travelling
  • When a player is surrounded by opponents, within one meter radius, trying to get hold of the ball, he/she cannot have the ball for more than five seconds. Such player is considered to be close guarded.
  • Players of the team possessing the ball shouldn’t stay in the restricted area of the opponent’s team for more than three seconds.
  • They should shoot the ball before the shot clock clicks.

What a Basketball Player Should not Do?

A player should not −

  • Throw the ball away out of the court boundaries.
  • Step on a foul line while free throwing the ball.
  • Step on the end or side line while passing the ball to a teammate.
  • Kick the ball.
  • Dribble or hit the ball with their fist.
  • Double dribble the ball.
  • Hold the ball and stay in the backcourt that contains their basket for more than 8 seconds, else the team responsible should bear a foul.

If a team or player violates any of the rules mentioned above, the team loses the ball and the ball is handed over to the opponent team. The opponent team throws it from the side of the court, this is called a throw-in.

Rules for women are slightly modified to lessen strain on players. Clara Baer, who introduced basketball for women, published a set of rules for women players in 1895.

Regulating Bodies

FIBA − Fédération Internationale de Basketball Amateur (FIBA) is the international regulating body of basketball. It governs rules, appoints referees for international tournaments and conducts world cups every four years for both men and women. It is based in Geneva.

NBA − A tutorial on basketball cannot be complete without mentioning NBA, the most important basketball league based in North America. NBA organizes league championships and is a member of USA Basketball association. Its players are highly paid and they also play for other teams outside the US. Attracted by the huge talent in the US and high remunerations, many international players also play in NBA league matches. NBA formulates rules for its matches that may be slightly different from the ones stated by FIBA.

BÁNH TRÁNG CUỐN

Hello các bạn hôm nay mình sẽ review món bánh tráng cuốn thơm thơm ngọt ngọt ngon ngon mà mình rất thích ăn mỗi khuya.

Để làm món bánh này, bạn chỉ cần một cái bánh tráng với thịt với trứng cút với rau thơm với sốt bơ với sốt mayo-ne với vài miếng khô bò xinh xinh vào xào bào là bạn đã có 1 dĩa bánh tráng cuộn ngon ngon ngọt ngọt thơm thorrrrrr.

Mấy bạn thấy không? Thor là một anh hùng trong Avengers và bằng cái búa sắt của mình Thor đã thắng biết bao nhiêu kẻ thù xấu xa bảo vệ nền độc lập nhân loại.

I LOVE THORRRRRRRRRR

Và về với bánh tráng trộn, chúng ta ăn bánh trắng trộn trong một buổi chiều mưa ngâu ngâu là ngon nhất.

Mưa và Thor và bánh tráng trộn ôi cuộc đời thật tuyệt vời he heh hehe hehe hehe hê hehe he heh eheh